Monday, November 5, 2012

Prepping For Christmas


I just love the movie Prep and Landing. So, I thought that a little Prep and Landing inspired Elf was in order. I had fun creating all of the accessories for this Happy Little Elf. Would you like to make your very own little Elf in training? If you haven't seen the movie yet, now's the time to grab a cup of hot cocoa, sugar cookies and watch it!
He even has a "tool" belt and the Gingerbread Man multiple usage device or something to that effect.
 
Prep and Landing movie
(photo off web)


Zoom in closer to get details on the peppermint buttons, tool belt and M.U.D gingerbread man.


The Elf is made just like the Snowman and Gingerbread Boy. Exceptions: use flesh color felt for face, green felt for suit, red felt for accents and brown felt for hair. I gently stuffed the hat before gluing it on the Elf's head. His peppermint box is painted inside and out, mod podged, and finally glittered (see Snowman for details on paint and using glitter on box). Paperclay for buttons, M.U.D gingerbread man and for accessories on belt.


Have a very wonderful day making happy crafts!
Holly

Friday, November 2, 2012

RUN, RUN, As Fast As You Can!


I have love the story of the Gingerbread Man for as long as I can remember, except the ending where the sly fox eats him. Boohoo.... Well, here is a version that the old sly fox will not want to eat. He is made out of felt.
 
He is made the exact same way that the Snowman is made. Of course the exception being use brown felt and you will need tiny ric rac and to paint the trinket box brown. I added more ric rac to the bottom of trinket box.
 

I didn't sew that teeny, tiny, reading glasses needed ric rac. I used glue. HINT: squirt a tiny amount of glue (dime size) onto a plastic top. I use any top available, you ought to see my mod podge top. Now use a needle to apply the glue onto the ric rac. If you will premeasure your ric rac and cut it before you apply the glue things will go smoother, just sayin'. I have a trick to keep ribbon and ric rac from unraveling. I will share it with you tomorrow. It is the way most professionals seal the ribbon. It will have a nice crisp finished look. Stay tuned :)

Gingy Boy

Gingy with his friend Mr. Snowman.


Have a wonderful and great Friday! And keep those 10 fingers busy and make little Gingy Boy!
Holly
 

Spooky Eyebrows.....

 
The weather ended up being beautiful! So, we carved the pumpkin outside. D#2 was so excited, she even drew a "scary" face with eyebrows. "I like spooky eyebrows on pumpkins!"
Dad scraping the "guts".

It was a little windy. Chasing newspaper across the deck. This was the extra newspaper for the guts.

She jumped right in, scooping the yucky stuff out by the handfuls.

Making a pumpkin pie!


Bullet was the only one who would try the "pumpkin pie". That dog ate alot of pumpkin. She is weird like that. We have to fence our little garden in or else she will eat all of the squash, tomatoes, peppers and eggplants. But she also eats rocks.

Here comes a bat!

Don't you just love the stockings?!? I originally bought them with the intention of making some cute sock monkeys but little bat found them and wanted them. They were a one size fits all lady's. Very long! I just cut off the excess and sewed it closed with the sewing machine. Worked like a charm....now if I can just sneak those stockings away from the bat.....
Full moon trying to peek out from behind some clouds and trees.

 
The spooky pumpkin with eyebrows.
Have a great and wonderful day!
Holly

Wednesday, October 31, 2012

Sew Much Fun Snowman!


Bat costume made: check
candy in treat bags for treaters: check
plastic trick or treat pumpkin found: check
leaves swept off porch: check
puppy's costume found: check
husband instructions given: check
pumpkin carved: not check
Well....the list is almost completed.
 Pumpkin butchering this afternoon:
time: 4ish
place: kitchen floor (too cold outside)
rsvp: regrets only- if you don't have the stomach for it


Today I have a sweet little tutorial for you. He may look a little complicated but if you can sew a buttonhole stitch, cut with scissors and thread a needle. He's easy peasy.

He is about 4 3/4" w/o his hat.

Print on 8 1/2" x 11" sheet of copy paper. 


Supplies:
white, red, black,, pink and green felt (wool felt is the best but regular felt will do too)
embroidery floss-white, black, pink
stuffing
paper mache trinket box (from Hobby lobby- I used 3"tall x 3" wide round box)*top painted white and bottom painted red, inside and out. Coated with one layer of mod podge.
clear glitter
mod podge
glue (I use Aleene's tacky glue)
paper clay


Print pattern and cut out. Cut felt shapes out. Take care when cutting icicles (I must apologize for misspelling icicles on the pattern-I meant to look it up and double check, I promise, I really did-but the excitement of the cute font side tracked me and I forgot). Anyway, you can cut the icicles with points instead of rounded end. Cutting sharp points and using tiny scissors will make cutting easier.


1. For face: Sew two front pieces together, straight edge to straight edge. Now sew on cheeks, then glue eyes (black felt cut out with hole punch that makes tiny punches) and nose on. Draw mouth on with disappearing pen. Stitch mouth with one strand of black embroidery floss using stem stitch. 
2. For back of head: Sew two back pieces together, straight edge to straight edge. Sew front piece to back piece, stuffing as you go.
3. For body: Sew front pieces together (straight edge to straight edge) and then back pieces (straight edge to straight edge). Now, sew front and back together. Stuff and leave neck open-do not sew closed.
4. Sew arm pieces together. Stuff.
5. The legs are sewn with gusset pieces first. Pattern shows placement. If you have any questions about this step just leave a comment and I will explain in better detail. Stuff.
6. Sew arms and legs to body.
7. Sew head to body. Don't worry if stitches show, scarf will cover them up.
8. Make buttons from paper clay and paint to look like a peppermint. Add one layer of mod podge and glue on snowman.
9. Place snowman on top of trinket box top. Mark placement with pencil and using a tiny piece of tape about 1/4" x 1/4" place on top of pencil markings. Paint mod podge on the white top and then glitter. Shake off excess glitter and let dry. Gently use a pin to help pick tape off.
10. Glue icicles to box top edges. Now glue snowman on.
--------------------------------------------------------------------------- 
*scarf is just a piece of wool felt. Hat is one 3/4" circle, one 1 3/8" circle and 2 3/4" x 1" piece of rectangle wool felt, stuffed lightly. Two freehand holly leaves with snippets of red felt to represent holly berries are glued to hat.
---------------------------------------------------------------------------
Snowman Trinket Box is now finished! If you have any questions, just shoot me an email or leave a comment. Enjoy!

Here's the pattern for the snowman. 


ps. These would make cute teacher gifts with a gift card tucked inside :)
 ---------------------------------------------------------------------------
Have fun and stay crafty,
Holly 

Saturday, October 27, 2012

Clanky, Clanky, Chink


This morning DH, D#2 and I went antiquing and Christmas browsing. Well....actually I went antiquing and D#2 came along because I promised to take her to the wonderful Peppermint Forest and DH came along to get lunch (and to drive b/c I hate driving in town!!). The antique store is called The Sleepy Poet. I am not sure how many vendors they have but it must be over 100. I found one sweet booth that was almost like a yard sale. Her prices were very good. Here is what I bought. Notice all of the "unreplaceables" aka glassware/ceramics.


 DHubby was in charge of the buggy and let's just say the store's floors were cobblestoned. Whenever D#2 and I lost hubby all we had to do was be quiet and listen for clanky, clanky, chink and we knew right where he was. I must remember to bring some jingle bells and tie them to the buggy so we will never lose him in any store, ever! In his most awesome practical mind he thinks if I am not near a buggy the less I buy b/c who in their right mind wants to shop with their arms full of unreplaceables, books, cookie cutters, large fisher price castle, keeping up w/ D#2 and chase after a buggy!?!?  And on an empty stomach!?!? *snort* doesn't work.

I have created these cute little Christmas Snowmen Shakers. They were so fun to make and when shaken they "jingle".


The Snowman on the left has a different mouth than the pattern.

Supplies:
~felt in assorted colors
~jingle bells (tiny, about the size of an English pea, you will need about 8)
~12" wooden dowel painted * I spiraled a ribbon down one and painted the other then put glitter on it)
~ribbon for the hat band
~poster board or light weight cardboard (from cereal/snack boxes)
~scrap of fabric for bow tie
~stuffing


 1. cut out all pattern pieces
2. cut out all felt pieces *note to cut out 2 face, hat and hat brim pieces
3. Using the pattern for face, hat and hat brim cut out 2 of each out of cardboard about 1/4" smaller, hat brim requires only one cardboard cutout.
4. Stitch cheeks, nose and eyes to face. A tiny drop of glue will help keep pieces from shifting while you sew. Using buttonhole stitch on nose and cheeks and tack stitch for eyes. Draw mouth on with a disappearing pen. Stem stitch mouth.

4. Sew white strip (3/4" x 12 1/2") to face.
5. To reinforce face and back of head cut out 2 cardboard pieces about 1/4" smaller than pattern. Do the same for hat but only one piece for hat brim.
6. After sewing white side strip to face apply small amount of glue to cardboard piece using brush spread thinly. *Please take care that the plain side not colored side (with all of the wording) is glued to the back of the face. You do not want "Cheez-its" showing through on Snowman's face. Glue cardboard onto back piece.

7. Fill match box with jingle bells. Follow instructions for adhering box and inserting dowel step here.
8. Stitch back on, stuffing as you go.

Hat

1. Glue cardboard pieces to back of front and back piece. Let dry.
2. Glue sandwich for brim: bottom brim, cardboard piece (cut 1/4" smaller than pattern), top brim. Let dry.
3. Stitch hat front and side strip (3/4" x 8") together. Then stitch on hat back.
4. Lightly stuff.
5. Stitch hat top to brim, using buttonhole stitch. You will match up the long sides of the hat top to the long sides of the hat brim, making sure to center. This stitching will keep the hat top tightly on the brim, so it is not necessary to worry about stitching the short side of the hat top. *If this is confusing please let me know in the comment section and I can upload a picture :) 
6. Glue ribbon to hat. Glue on holly leaves and berries.
7. Add scarf or bow tie.
8. Now you can add glitter to dowel. I also like to apply mod podge to my ribbon spiraled dowel. This keeps the ribbon from unraveling.
--------

------
Print size should be set at 8 1/2" x 11". It should fit a whole sheet of copy paper.


Above: I use a tiny hole punch to punch out holly berries. Since I use a wool blend felt the cut is pretty sharp but sometimes sharp tiny scissors are needed to help out. The long doll need is a wonderful tool for picking up the tiny berries to adding glue to places. I love this useful needle!

Hope you enjoy this tutorial and if it is as clear as mud, just email me and I will try to explain better. Have a wonderful, crafting weekend,
Holly

Thursday, October 25, 2012

Christmas Cardinal and the Candy Cane

 
I know that it is a little early to start on Christmas crafts.... but,  if you don't start now chances are you won't have enough time come December. I have made this cute little pom Cardinal. He is very simple and you could make him into any bird: yellow for canary, blue for bluebird or jay, gray for mockingbird, etc. He would also look adorable on presents. You could add a small gold thread loop to make a hanger for him to be an ornament. Have fun! 
 
Supplies: Red yarn
red, yellow, black felt
scissors
red and white pipe cleaners twisted together
tiny black beads, I used the heads of applique pins painted black.
Patterns for felt pieces. Felt needled: red, black and yellow.


Since this bird is tiny, I used old school way. I wrapped the yarn around my fingers about 45 times.

Gently remove wrapped yarn from fingers and tie it in the middle with an 8" piece of yarn. *Tie it tight!

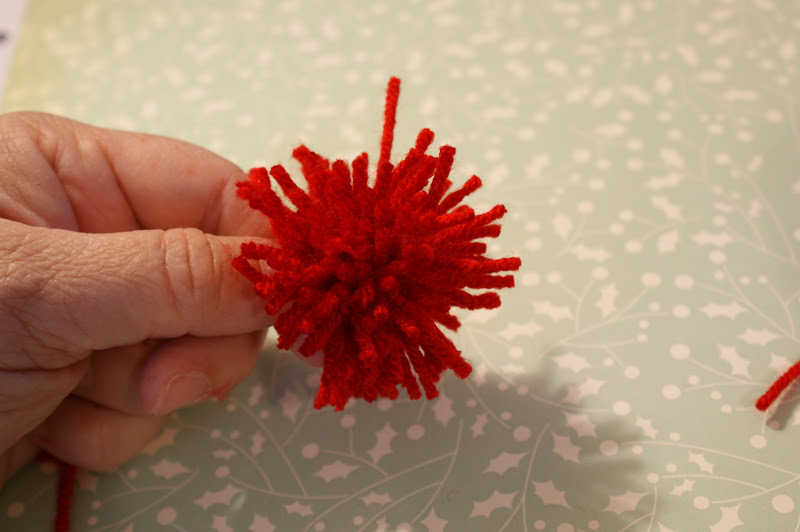
Now snip all of the loops. The long piece of yarn that you used as a tie makes a good handle to hold the pom while you snip.

Now it looks like this. Crazy hair bird! He needs a little trim.


Still holding long tie tails, start trimming your pom. The closer you trim to the center the tighter and more compacted your pom will look. Go ahead and trim, it is not as hard as it seems! It is quite fun. Now you just need to glue tail on first (this makes placement of the wings and face easier), then wings, face, beak then beads. Glue Cardinal to pipe cleaner, which has been twisted into Candy Cane shape. You're finished!!


Wouldn't he look adorable on a real Candy Cane to give as a gift? The wheels of craftiness are turning now!
Have a wonderful and blessed day!
Holly

Monday, October 22, 2012

Falling Leaves

 
Yesterday I made some fabric leaves for a small swag. I had purchased a swag but just wasn't happy with it. It actually looks better in the photo than in real life. The pumpkin looked really fake and the acorns were purplish blue (not shown). I have some wonderful Jo Morton fabrics that I had been saving and knew that this was the project for them.
 
Fakey pumpkin and yucky leaves.
 
 
Above: Pattern for leaves. You could really make these out of any color fabric or felt. How about some red or aqua or even bright yellow leaves or even some with a 30s flair. Cute!
 
Supplies:
Fabric of your choice
6" painted brown floral wire* see note
double stick fusible web
(double stick kind-just means you can iron two fabric pieces together-I get mine at Hobby Lobby. Amazon sells it too if you can't find it locally. Any fabric shop will carry it.)
Sharp scissors
 
1. After you cut out leaf patterns, lay the pattern on fabric and cut out two rough square for each leaf (ex. the leaf in bottom left corner requires two 4x5" squares and same size fusible web).
2. Layer the four pieces together, fabric, fusible web, fabric and pattern on top. Now carefully trim the bottom of the leaf to all layers. This will help with placement of the wire.
3. Make a sandwich: fabric, fusible web, wire-4" sticking out & 2" inside, fabric
4. Now iron the sandwich together for about 10 seconds. If you forget the wire after you have fused the pieces together don't worry, warm the fabric for about 5 seconds and the glue will remelt and you can lift the bottom of the leaf and insert the wire-just iron closed and let cool.
5. Lay the pattern piece on top taking care to line up the bottom of the pattern to bottom of the trimmed fabric.
6. Carefully cut your leaf out. You can crinkle the leaf to get a more realistic look.
 
*If you don't have white wrapped floral wire, you can make some. Wrap a pipe cleaner or plain wire with masking tape and paint desired color. I painted my brown. The pipe cleaners will be a little thicker than plain wire, but that is ok.
**If you don't have fusible web or can't find any, I think mod podge would work wonderfully. It might be a little messier but put some wax paper down and clean up will be a breeze!


Trim bottom of leaf pattern (before fusing pieces together) to make placement of wire easier.

Trimmed fabric(bottom layer) and wire in place. Now add trimmed fusible web and trimmed top fabric piece. Notice that my wire is white, I forgot to paint it before I started. Sorry for that ugly water stain from the iron. Didn't notice it while I was doing this project. Time for a wash!

The whole sandwich ironed.

Above: I pinned my pattern in place to make cutting out the leaf easier. Sharp pointy scissors are a must!

Above: All my leaves.


My velvet pumpkin with real pumpkin stem. Acorns are needle felted with real acorn caps. Tiny gourd on the right was part of the original arrangement. Learn how to make pumpkin here.


Above: My dressed up antique wooden hay fork. The tiny quilt is my take on a quilt from Primitive Quilts magazine called Country Days. I finished and quilted this in three days! Whew! That was a marathon, but if I didn't get it done I wouldn't be able to enjoy it this Fall, because it would have ended up in my UFO (un-finished objects) box. I pieced the whole quilt on my antique Featherweight. This is the first project that I have made on the little fw. I found that I was very accurate on this quilt and all but two or three points lined up beautifully. Using the rotary cutter for this small project just doesn't work. I used the old fashion way. I made two paper templates (the quilt only uses two squares!) and traced them on the fabric with a permanent, yes permanent pen and then cut all those squares out with scissors. The thin line on the permanent pen is much more accurate than the disappearing pen tip. This is why I was able to finish in three days. Usually I spend hours ripping out lopped off points trying to make them reappear. Maybe I shouldn't fixate on such small details but I can't help it.
Hope you have a wonderful day and get crafty and finish some UFOs!!
Holly