Showing posts with label trinket box. Show all posts

Wednesday, September 18, 2013

Classic Creature Feature: Frankenstein and His Bride Pattern

I have finally finished all of the Fall decorating. But the house is in a mess! We are having wood floors installed and since we are such diyers it is taking us a while. Hopefully we will have it all finished by this weekend and I will be able to take you on a little Fall decorating tour. 

Here's the pattern for Frankenstein and His Bride. Hope you have a wonderful time making them. If you have any questions, please don't hesitate to contact me. 


-------------------------------------

I promise to post his lab book soon. I have been sick since Friday of last week and as of yesterday feel much better! Just a Fall cold with fever, chills, vertigo (yea....bent over to plug something in on Friday and bumped my head hard on the wall, so weird, I couldn't judge the how far the wall was because my ears were so stopped up. Like I said, weird.). But I am so much better today. 

I hope that each and every one of you have a most wonderful vertigo free day!
Holly

Friday, August 23, 2013

Classic Creature Feature Friday: The Mummy!

Did you guess the Classic Creature right? Carolyn did! It's the Mummy! Have you ever watched this movie? It is a really good Classic Creature Feature (but not for the kiddos), even though the man's mad laughing in the beginning is kind of crazy.
Make the Mummy body the same way as all of the other felt trinket box characters. To save a few steps instead of cutting out 4 head pieces (since the center seam will be covered with mummy gauze) you could just cut out 2 circles and instead of 4 body pieces cut out 2. For the 2 body pieces: cut out two body paper pattern pieces and lay them side by side with the straight sides touching, pin and then cut out a single felt piece for the front. Do this step again for the back.

The Mummy is covered in strips of 1" cheese cloth. You can find cheese cloth in the baking aisle or where the canning supplies are located. I didn't even glue the ends, just tucked them in. For a more old antiquey mummy look, you could soak the cheese cloth in a weak brew of tea or coffee.

Back of box.
Paint lid a sandy color and the box a light brown. Hieroglyphics are painted with black paint.

Front of box.

Paper clay eyes. Make a ball of paper clay, flatten one side, let dry and paint white with black centers. Mouth is embroidered on using a running stitch, you could easily use a stem stitch. I lightly dusted the cheek area with blush.

I did glue some sand on the lid. To do this, finish painting the lid. Pour a little sand into a paper plate. Using masking tape, tape two spots about 1/4" x 1/4" square where the feet will go. Now mod podge the entire surface, leaving the taped pieces free of mod podge. Smosh the lid into the sand. Let dry for about 30 min. Lightly brush off loose sand. I globbed mod podge on top of the sand using a 1" wide brush, being very careful not to "pick up" any sand. This may have to dry for a while. I think mine took about 3-4 days to completely dry. After dry, with a needle, pick the tape off. You can now glue the mummy on.
Pattern found here.

The Monster Mash is almost complete! Just two more to go.
The next guy is going to give you a shocking good time. Can you guess?

Have a wonderful crafty night,
Holly

Friday, August 16, 2013

Creature Feature Friday! The Wolf Man

Thank you so much for all of the sweet comments on Kitty Girl! She is really easy to make and such a cute ornament. Now, for  the next Creature Feature. Did you guess correctly? It's the old movie The Wolf Man! That one was scary to me, but also a fun movie. I loved the old Gypsy lady. Did you see the one called Silver Bullet? Oh boy, was that movie SCARY and intense! I saw it as a teenager on t.v., I can't imagine watching it on the big screen. Well, my Wolf Man is not that scary. He is rather cute.

Tiny claws on each hand!

Movie poster for the Classic!

"...howl at the moon...." is painted on the lid. I couldn't find the round box to match this lid, so technically he is not a trinket box yet ;)

Side view.

Back view.


Supplies:
Remnant of fake fur (found at Hobby L)
Wool felt: mossy green, black, & brown
2 black safety eyes, clip the "stems" off
white paper for the teeth
paper mache box with lid, painted black using mod podge as a sealer
embroidery floss to match wool
-------------------------------------------------------------------------------------
Pattern here
-------------------------------------------------------------------------------------

Cut all pattern pieces out. Cut wool felt pieces. Be very careful when cutting out the fake fur pieces. You will want to take tiny snips at the fur when cutting. Do not take full scissor cuts because this will cause the fur to look unnaturally cut.

Sew the arms, legs (don't forget the foot gussets), body and inner head. Attach all of these parts using glue or thread. I like thread because you don't have to wait for it to dry.

The main thing working with fake fur is to not get the fur caught in the stitches. So, carefully sew the fur head, leaving the chin area open so that you can slip it over the inner head. I used a button hole stitch as I pinched the two pieces of fur together. I did put a few pins in it before I started sewing to keep it from slipping. 

Now trim the fur from the face area, pattern will show you the area to trim. Glue eyes on (I made a comma shape on the lower area of the eye to give it some depth. I just used acrylic paint. If it rubs off, I can always just paint it right back on so I didn't worry about sealing it.), glue nose on and then mouth. The teeth were cut out of copy paper and glued on using a glue stick.

Sew the clothes onto the body. Pants first then shirt. Now place the fur head on. You can leave it loose or glue it in place. Glue claws on and then glue him onto the trinket box. I like to "brush" Wolf Man's fur by blowing on it. I find that this works great at making the fur stand on end, plus it's fun!

That's a wrap!
(next Creature Feature clue above! Can you guess?)

I hope you have some howling good fun making him,
Holly


Saturday, February 16, 2013

Oh Blarney Stone!!

Today I tried to photograph this....

But kept getting distracted by this....

and this..... 

while trying to catch these....... 

Yes. We had our first really big snow this year today. Only 1/2" but I'll take that. As of 9pm it is still on the ground and is suppose to freeze on the roads tonight. Sunday School has been cancelled but the 11 o'clock service is still on. We are going to try our best to get there.

Look what Elizabeth sent me! Don't you just love them! The sweet little girl faces are beyond adorable. They just speak to my heart. And do you see the domestic Valentines? Oh my....I just love them! The vacuum is the cutest. If my vacuum looked liked that I would have the cleanest house in the world!!! And the lovey popcorn bags.....goodness me. They look just like my husband and me. We love to eat popcorn at night while watching t.v.

The bowling Valentine also reminds me of my husband and myself. During college I had to take an elective that was some sort of sport. I wanted to sign up for diving, but the class filled up too quickly. So bowling it was. My best friend, Luann, and I had a blast. During "class" at the bowling alley my future husband use to come and watch me bowl and then walk me to my car after class. Such fun memories!

And look what else Elizabeth sent me. Some beautiful grandmother's flower garden quilt squares. These are so pretty and each one has been pieced by hand. I am going to have to make something special. I am thinking about making a couple of pillows with the flower garden quilt squares in the center of each pillow.


Elizabeth's paper crafts are just wonderful. She always makes each one so special and the attention to detail is amazing. Go ahead....take a look and zoom in closer.

Does this not fit me to a "T"!? I love sewing and sewing on my Featherweight is sew much fun! This sweet little girl is sewing on her Featherweight and making Valentines! I love the crepe paper border and again that attention to detail is amazing.

Here's the back of the Valentines. Look at the sweet little tomato pincushion!

I love this nut cup. I wasn't sure exactly what a nut cup looked like in person. We always used cupcake liners as nut cups for parties. Elizabeth's is so cute. I love the vintage flowers and the adorable pipe cleaner bird. He is holding a sweet little Valentine in his beak.

I love Elizabeth's clay creations. This little bird is so adorable. I love his collar.

Sweetest face!

Here is a card that I made today for a baby shower that I attended......today. Ever the procrastinator..... I used Elizabeth's layer technique and crepe paper fringe. The vintage card was scaled down 50%.

Back. This image was copied from the inside of the card and then cut out.

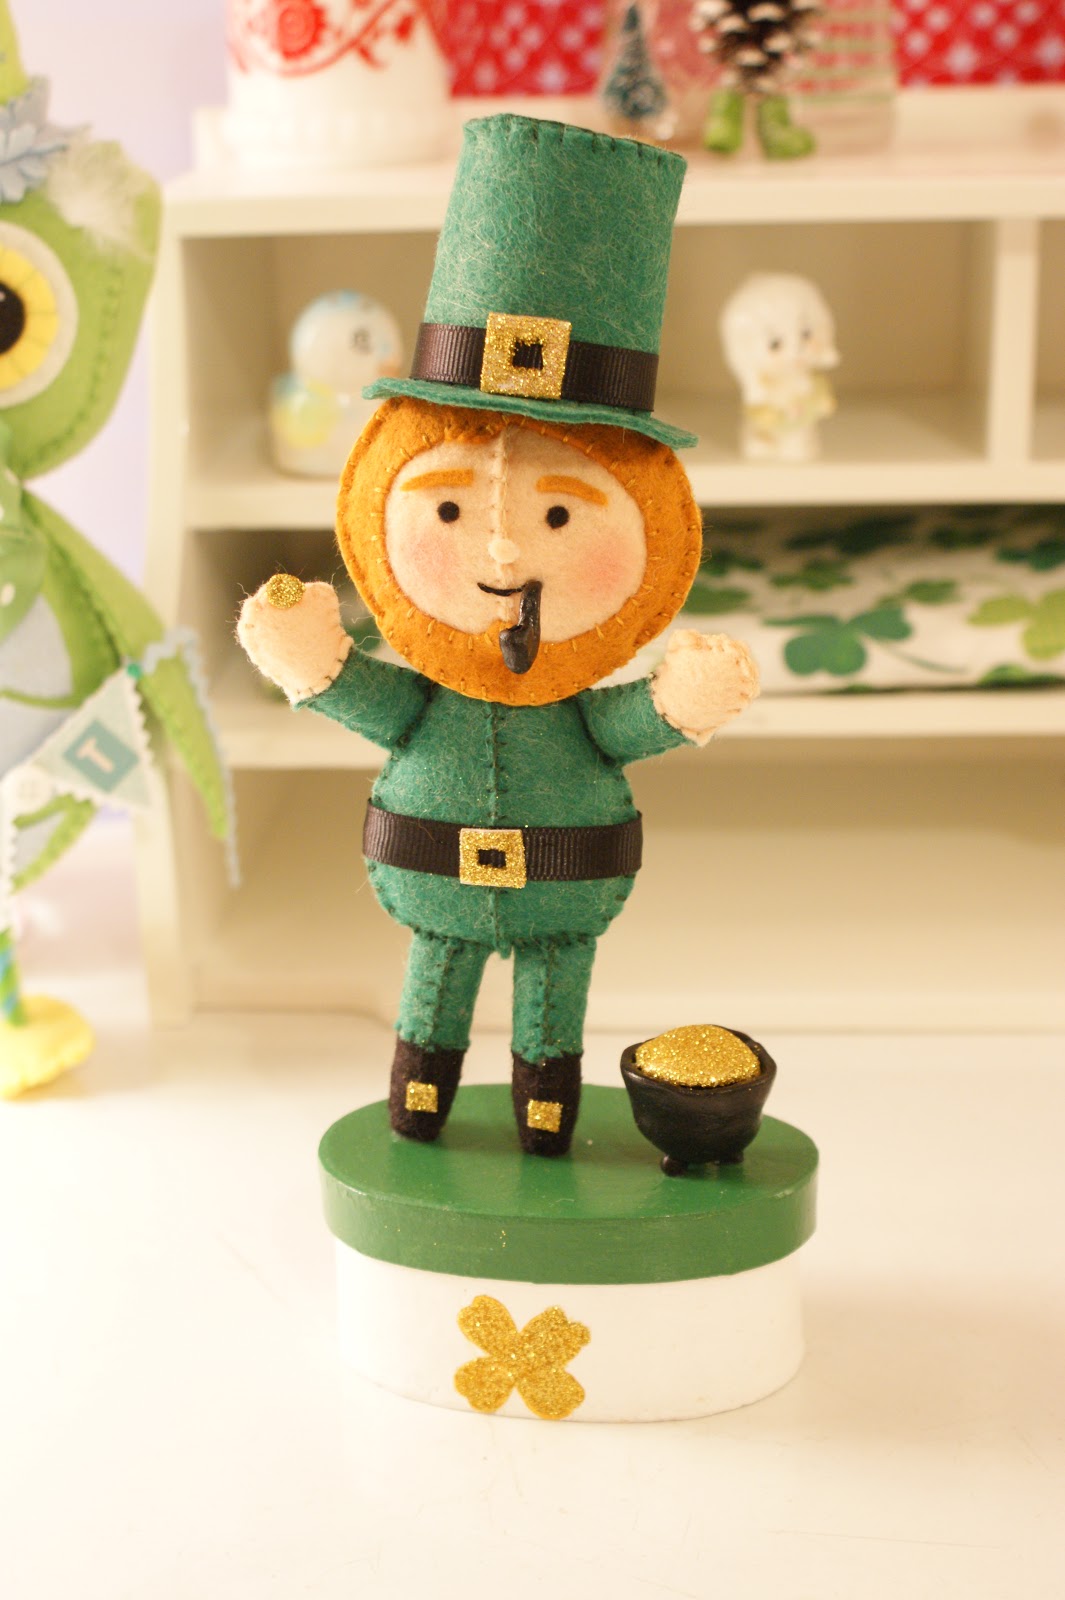
Here is little Patrick the Leprechaun. He is a sweet little guy that likes to curl up in his chair by the fire at night. Smoke curls around his head as he lights his pipe. His pot of gold always by his side and a small gold coin in his hand.

The smoke in his pipe is just stuffing. His gold coin and pot of gold are made from paper clay as is his pipe.

You do not have to add the smoke. Here he is without the smoke.


Patrick is made just like all of the other felties. The hat band and belt are just pieces of black grosgrain ribbon. His buckles are cardstock covered in glitter. His box is painted real simple. Green top and white bottom. I painted a four leaf clover in gold paint, then added a layer of glue and then glitter. The glitter that I used is a very fine powdery glitter. One little piece of advice while working with this fine glitter....no matter how much you need to cough, even if it is the choking kind of cough....don't! 'nuf said.

I hope that you enjoy making this little lucky guy. I also found out that I don't have a lot of St. Patrick's Day decorations....go figure. I have always loved St. Patty's Day, especially the corn beef, potatoes, carrots and  gold glitter.
Have a gold glitter kind of night!
Holly
ps as for the title of this post.....well.....I just love the word "blarney" :)

Monday, January 28, 2013

Did You Not Know....?

Did you not know George Washington was the only president who did not live in Washington, D.C?
Did you not know George Washington was the only president who was unanimously elected?
Did you not know George Washington had all of his teeth pulled out when he was 57?
Did you not know that George Washington never shook hands with people?
Did you not know that George Washington never had any biological children?
Did you not know that there were only 13 stars on the American flag when George Washington became president in 1789?
Did you not know that five states were added to the Union while George Washington was president?
Did you not know those state were: North Carolina, Rhode Island, Vermont, Kentucky and Tennessee? 
Did you not know that George Washington's shoe size was a 13?
Did you not know that George Washington was 6'2"?

I hope that you have enjoyed these "Did you not know..." trivia facts. Sweet little daughter #2 loves to treat us to facts she has learned from various places. She always starts her factoid sentence with "Did you not know.....?". 
"Did you not know that lizards' tails pop off and grow back?" "Did you not know that each snowflake is different?" "Did you not know that bats use echo location?" "Did you not know that dolphins breath air?" "Did you not know that the flu is worst now than a few months ago?" Ummmm..."Did you not know that God knows how many hairs are on our head?" Oooooo...."Did you not know that some birds can fly upside down?" Well......"Did you not know that cows have 4 stomachs?".....Ok.......we arrive at school. Time to get out and start the day and learn more "Did you not know...?" factoids. Only 6 1/2 more hours until I become smarter than I am right now :) Can't wait!!
George Washington

George Washington is made just like all of the other felties. 


His Tricorn Hat. Cut out the circle and sew "a" to "a", "b" to "b" and "c" to "c". Take tiny stitches, just enough to tack.


Make George's body first. Flesh arms and head, tan upper legs and pants bib. The pants bib is sew on last after everything else is sewn in place. The purpose of this bib is to make the pants look like they extend up to the waist line. You could also glue the bib in place if you wanted to. The body and hair are made out of white felt. Coat is blue with tan trim and gold embroidery floss tassels on the shoulders. The buttons are just pieces of aluminum foil cut out with a tiny hole punch and glued on. The ruffly shirt is just lace glued in place. Boots and hat are made out of black felt. Use these links here, here and here if you need help on how to make the felties. 

An unraveled piece of yarn or tiny piece of wool roving makes a perfect ponytail. 
His flag only has 13 stars and is hand painted on a scrap of fabric and glued onto a q-tip with all the tips cut off and painted brown. On the lid I painted the American flag. The bottom of the box I hand painted each president's name. I then painted brown (very very watered down) layer over the lid and bottom and them immediately wiped it off. This gives an antique look to your box. 

Happy (early) Presidents' Day!! I have one more Presidents' Day craft to share with you and then it is off to Easter! Can't wait!

Have a wonderful crafty night,
Holly


Thursday, January 24, 2013

Why, hello Mr. President!

February brings two of my favorite February holidays: Valentine's Day and Presidents' Day. I love Valentine's Day for the obvious: express love to the ones that you love. I love Presidents' Day because of the history. I have always loved history, even political history. In 10th grade I had a history teacher, Mr. Carter. He was a kind, gentle old school soul who enjoyed history and enjoyed talking about it. He loved to call us "Dear hearts". The year that I had him would be his last, he retired after that year. 

When I think of Presidents' Day, I automatically turn to President Abraham Lincoln. With his iconic tall hat and black beard he makes a perfect Presidents' Day figure. 

He holds a miniature Gettysburg Address in his left hand and a feather pen in his right. I did some research and found out that Lincoln likely used a type of fountain pen but I thought the feather pen looked old fashion.


I know that it looks like he has a lot of parts, but he really doesn't. I didn't want to squish them all together onto one page so I spread them out over two. 
He is made the same was as all of the other felties. Follow the beard and robe (this will help with Lincoln's coat) instructions for Father Time and the hat instructions for the Snowman Trinket Box. If you notice the hat brim has a section cut out. This cut out will help the hat fit better on Lincoln's head. 


His head, nose and arms are flesh colored felt. His hair, beard, hat, eyes, eyebrows, coat and legs are black felt. His body was made out of white felt. Rub some blush on his face for cheeks. 


 A 1" piece of black ribbon was tied in a knot and used for his necktie. It is easier if you start with a 2 1/2" long ribbon and cut to size. I cut a feather down to size to use for his feather pen. His mouth was stitched on using two strands of embroidery floss.
I painted the lid to his box black. I printed out a copy of the Gettysburg Address and then mod podged it on to the bottom of the box. Go ahead, make him in honor of your favorite history teacher. What fun! I will use him in my 4th of July decorations, too! If you feel too crunched for time  to finish him for Presidents' Day, start on him now and finish him for the 4th of July!

I do have another historical president coming up. Can you guess who it might be? Hint, he did use feather pens. And I will also have a Presidential shaker soon. Can't wait to share with y'all!!
Have a wonderful, crafty night,
Holly


Tuesday, January 22, 2013

Raggedy Ann, I Love You!


As a child, I loved the Raggedy Ann stories. I have a book from my childhood displayed with some Raggedy Anns and even my very first Raggedy Ann doll is among them.

".....I am more worn, for each new rag doll has a candy heart and on it is written 'I LOVE YOU', just as is written on my own candy heart." said Raggedy Ann (The Raggedy Ann Stories).

As I was thinking over things to make to celebrate Valentine's Day, Raggedy Ann kept coming into my thoughts. That's too hard, I can't make a Raggedy Ann doll. But, the more I thought about it, the more it seemed possible. So...putting needle and thread to felt, I finally came up with her: 

i love you!

To make the apron: stitch panel 2 to panel 1. Add panel 3 to the bottom (this will make the apron look like it is on top of the dress without wasting all of that blue felt because it is unnecessary to make a full dress since the apron would cover it up anyway). Sew the pocket on and then add the piece of blue fabric hankie. You could use a blue piece of felt instead of fabric.

If you have made any of my other felt dolls then she will be a snap! If you have not, just go back to the trinket box tutorials to see how they are made. These dolls are really easy and no sewing machine required.

Her arms and legs are made like the Santa trinket box. Stitch her hair on after you have finished her face. Before you add the head to her body, glue the apron straps on her shoulders and then add the finished apron. A running stitch pulled tight will secure the apron on. Either glue head on or stitch it on.

The red stripe on her stockings are just pieces of red embroidery floss glued on. I felt that this would be the easiest way to get the red stripes. You could embroider the red stripes if you want too.

Back.

Raggedy Ann is ready to give Raggedy Andy her Valentine.


Here's my small collection of Raggedy Ann and Andy dolls. The three in the back I made. The doll on the left I am not sure where I got her and the one on the right is my old doll, I believe that I got her for Christmas when I was one. I love her, she is clean but stained.
The Raggedy Andy book is mine that was given to me by my grandmother in 1977.


Cutie pie Valentine child. Made from Elizabeth's example.

Another cutie pie Valentine child. They are just so adorable that I had to make some. I do have a few more in various stages of completion. Hopefully I can get them all finished and on my Valentine tree.

Have a wonderful day and keep those crafty fingers busy,
Holly
ps If you are unable to print any of my patterns, just let me know and I can email them to you :)