Showing posts with label Easter. Show all posts

Monday, March 25, 2013

A Swap, A Parade and A Shaker

Look at the adorable banner! Debby of Cozy Blanket coordinated a Spring swap and then she made the swaps into a banner. It is so cute above my Easter Parade.

Easter Parade


Adorable bunny by Debby (Cozy Blanket). Thanks Debby! And I do think he looks like a Suzy's Zoo. Sweet paper duck by Jane (AraliaJane). I love the gingham paper! And tiny pom poms. Thanks Jane! 

Cutie pie bunny by Carol (Arts and Sand). I love how he seems to be leaping across my craft room. Thanks Carol! PS her stitches are so tiny! Look at this sweetest little wreath by Michelle and Ashley (The Tattered Quilt Cottage). 

A closer look because it is such a wee little wreath! And a tiny little bee! Thanks Michelle and Ashley! 

And look at this adorable prim bunny! He is in a packet of carrot seeds! So fun and cute. I have put him in my dining room on the pie safe. He feels right at home there. He was made by Penny (At Home in English Valley). Thanks Penny!
These ladies are one talented bunch! I am so thrilled at all of the bunnies, ducks and bees that I received. You can tell that each one is a true labor of love! I am going to proudly display this banner & bunny seed packet year around in my craft room. Thank you again ladies! 

Here's the little duck that I sent. The two rules: make 5 and it had to be something that reminds you of Spring. He also had a felt half egg that I placed him in. I made the egg also. He is about 2 1/2" tall, that doesn't include his feather tuft.
I hope that you enjoyed looking at Debby's Spring Swap! She has pictures of all the swap items at Cozy Blanket.
Thanks Debby! I had a blast!


Here's a close up of the Easter Parade.


Since everyone else had a Grand Marshall of their Parade, I figured that mine needed one too. Poor thing. She started out like this:
In pieces and with just her undies on >:0


Glue, fabric,tulle ,ribbon and flowers later and we have a well dressed Grand Marshall with an Easter Bonnet! She feels beautiful now.


Lamb shaker. Spring or Easter Lamb Shaker.
I used a material that looks like shaggy fur on her. I bought it at Hobby Lobby. It is real slippery and the back is kind of silky. I call it fun fur.

Make the shaker out of plain felt first. Then cut out the fun fur circle and glue it onto the felt on the side that you will be using for the face. Since this material looks like it would be hard to work with I thought that just gluing a circle of it onto the front of the shaker would be the easiest thing to do.

After letting the glue dry, trim the fur face so that you will be able to glue the actual face on. I trimmed it all the way down to the silky material. 


Palmer Bunny and Lamb
Glue the ears on. I used Elizabeth's (Creative Breathing) tutorial for the felt flower necklace. I think that she looks so much sweeter with the flowers around her neck. If you don't want to make flowers a ribbon bow would be just as cute.
*Don't forget for the head, cut 2 from felt and 1 from fun fur.

Have a wonderful day and please share if you have joined in on the Easter Parade, I would love to come visit,
Holly


Thursday, March 21, 2013

Shaking In To Spring!

I am so glad that Spring has finally arrived.......at least it has on the calendar. It is still very cool here and they are talking about a freeze warning tonight. Well, nothing like little lambs and fuzzy chicks to make it feel like Spring. These shakers are a little different than my normal ones.  


1. Cut 8 sections out of pink wool felt. These sections are for the head. 
2. Sew one section to another, and so on until 4 sections have been sewn together. I used the buttonhole stitch.
3. Transfer the face onto the 4 sewn sections. Stitch mouth, glue nose and glue the eyes on. The teeth can be added now or you can wait until the head is finished to glue them on.
4. Now sew the other 4 sections together.
5. Take the two halves and sew them together. You can add a shaker box before sewing the head closed, but I didn't bother, so really my shakers are not shakers :) . Stuff the head.
There will be a small hole at the top of the head that you can either sew shut or put a party hat on him. I cut a small circle and stitched it over the hole. 
6. Cut the ears out of wool felt. Cut two out of the same color felt as the head and cut two out of white felt.
7. Stitch the ears, I added pipe cleaners to mine so I can pose them.
8. Cut two tiny slits where the ears will go. My slits were a little smaller than 1/2". Stitch or glue the ears in place.
9. Make a collar.
10. There will be a small hole at the bottom of the head. Insert the prepainted wooden dowel into this hole. You can add some glue to the tip of the wooden dowel before inserting it.
11. Now add the collar and whiskers for the bunny. I used crochet thread for the whiskers.

Chick
The chick is made the same way with exception of the face and ears.
I used a pom pom for her collar.
I wanted to make a lavender chick but didn't have any lavender in my wool stash :( 


(same picture, different background. And look! The little chick with party hat popped in to say "Hi!")


Birthday party chick in a cloche. She is celebrating with a tiny felt cake. I wanted to make one of these for Christmas, so I bought a bunch of these cups. Well....the Christmas season was so busy that I never got around to making any. But now, I am not only addicted to party hats but also plastic cloches! You will probably get tired of seeing these little dioramas (because by now you must know that I love wee, tiny, little things), but I promise they will all be different *<:)  I might just make it a "Where's Waldo" type of fun- "Where's Cloche"! 


Funny bunny with party hat!  

I think bunnies with bent ears are so cute!

Just thought you might enjoy looking at some pincushions that I just completed.
Domestic Divas!
Vintage Diner theme.

Cherry Pie


Shasta Camper 

Mermaid

Bluebird of Happiness

Just if you are interested, there are more photos of the pincushions in my Etsy store.


Have a wonderful night and keep those crafty fingers busy,
Holly


Thursday, March 14, 2013

The Grass Is Always Greener........

Busy in my craft room has brought may hours of joy. Easter and Spring swaps to be made and decorations to assemble. Oh how I love this time of year! 


Vintage paper Easter grass is hard to find. I love using the paper Easter grass instead of the plastic. I remember that the vintage grass was a type of wax paper that was very narrow, much narrower than today's paper grass. My wide paper grass looks vintage but not vintage enough for me, especially when I tried to pair it with those adorable tiny fuzzy chicks. It is too wide and dwarfs the chicks. So here's my solution. Cut the grass in half length wise. It works and looks oh so vintage!

Left: regular unaltered paper grass. Middle: straighten the grass out by gently pulling it between you fingers. You can also use your fingernail to "iron" it out by gently pulling it between your thumb nail and the tip of your pointer finger. Right: now fold the grass in half, keeping it aligned, then in half again and one more time, keeping it all aligned. You can finger pinch it to make it stay. Now cut the grass in half long ways, just don't let it slip out of alignment. 

Grass cut in half long ways. Use very sharp scissors.

To give it more of a vintage look, crumple it.

See the difference. On the left- grass uncut and on right- the cut grass. Now you can cut it into any length you want. Sometimes I cut it into 1" pieces and sometimes I leave it the full length.


Little spoolie chick, he is on a nest of full length, cut in half grass.
 Can you tell that  I am addicted to party hats? If you stay in my craft room long enough, you are going to end up with a party hat glued to your head. They are such fun! and oh so simple to make! A little trick: I like to copy my pretty papers onto copy paper using the color copier. This makes the little hat easier to curl (because the copy paper is not as thick as the scrapbooking paper) before you glue it together. And I curl the hat around a pencil, to give it a kind of "memory" so that when I glue it I am not trying to fiddle it into a cone. And if you copy newspaper to make cute party hats or sailor hats, you don't get the ink all over your hands!

Dress up a simple egg cup with ribbon and a handmade rosette. I made mine from plain scrapbook paper, felt circle (used my Cuttlebug to cut out the beautiful, perfect circle) and pink pom pom. Need to make her a party hat! Her grass is non cut paper grass. The larger size grass fits her well.

Pom chick on a spoolie. Spool is plain one from Hobby Lobby. Vintage style flowers are made using my tutorial and eyes were made using my black pearl tutorial.

Sweet little fuzzy chick. His grass is cut in half and suits him well. He is wearing the tiny party hat. And a simple ribbon bow.


Here's some more sweet vintage wrapping for your personal library. Have fun! 

Notice the tiny doll rattles. Elizabeth of Creative Breathing made the most adorable doll rattles from paper clay. They look just like the one on the wrapping paper.

Have a wonderful crafty day,
Holly


Monday, March 11, 2013

Come And Join The Easter Parade!

Come and join the Easter parade!


I fell in love with this picture:

Shirley's (Zetta's Aprons) lamb inspired by Sandy's (Sandy's Show and Tell) lamb.

I first spotted it on pinterest. Then Elizabeth (Creative Breathing) blogged about it and then about her Easter parade:


Oh my stars! How could you not fall in love with a parade like that? Of course I had a few nursery planters hanging out in the craft room. Wouldn't they just look adorable all fancied up to join in Elizabeth's parade?
I looked closely and carefully at Shirley's and Elizabeth's lambs. I have crepe paper, paper Easter grass, doo dads to ride in the back, but what about the vintage millinery forget me nots? I don't have any of those. I looked on ebay and etsy. It's around $10+ to buy about 40 individual flowers. Bummer.....it's going to take a lot more than 40. Time to dust off the old thinking cap. How about cutting 100 individual flowers out of felt? Crazy!! What do I have that will cut multiple things out at once? A flower punch? No, not strong enough for the wool felt. Hmmmm....how about my Cuttlebug? A Cuttlebug machine is usually used to cut shapes out of paper but I have used it for felt before. I love cutting perfect circles out with it. Beautiful, perfect circles....now that ROCKS! It is hand powered, so it is not very expensive. There are some demonstrations on youtube if you are curious. You can get the die cuts (& machine) at Hobby Lobby and with the coupon they end up being less than $10 for around four dies - if they still let you use them on ProvoCraft products or actually if ProvoCraft lets you. Sorry, I can't remember the cost of the Cuttlebug, you might find a nice used one on ebay. Now the big question....do I have a tiny flower shape die cut? Yes!! 

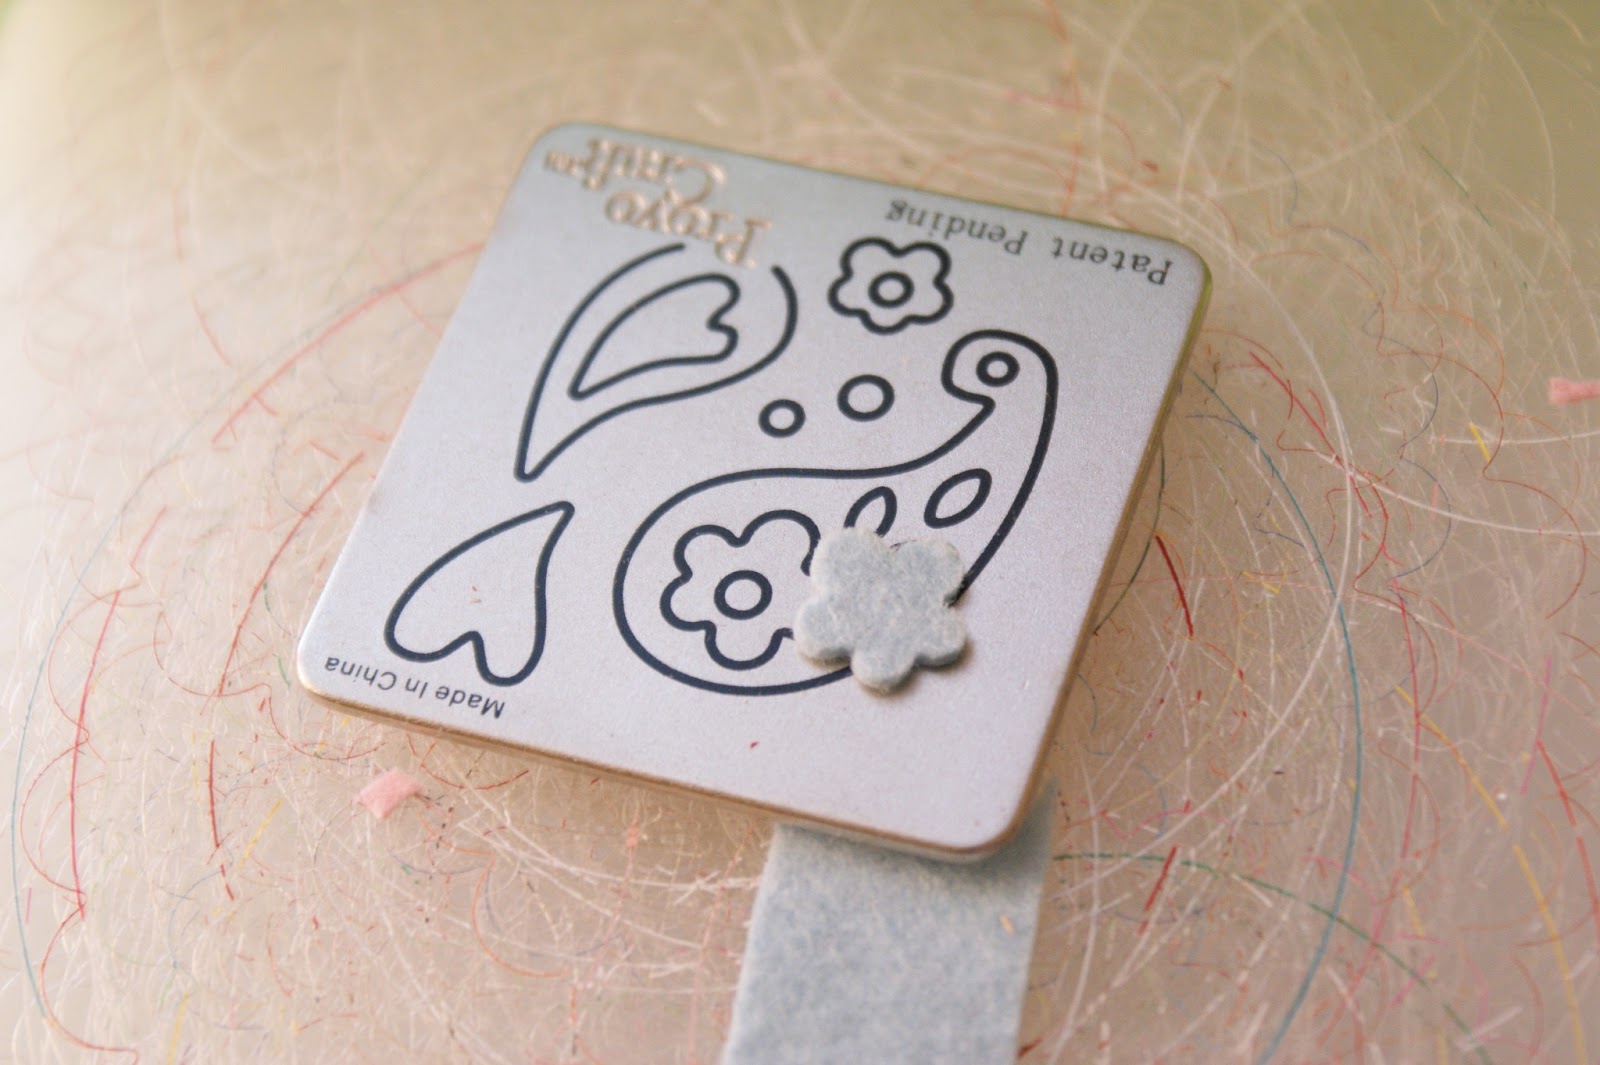
Cuttlebug, "plates" and die cut. I used plates "A", "B" and the other "B". 

I used the flower in the paisley. There is a hole in the center of the flower. The hole was too big for my stamen stems so I used a hole punch to cut some paper holes and glue them to the back of the flower with the felt "plug" still in place. 

Sandwich "A" plate, "B" plate, die cut sponge side up, felt (I did a few layers of felt to make more flowers quickly), other "B" plate.

Cuttlebug sandwich. Using the hand crank on the side run the sandwich through.

Felt flower.

Paper hole glued onto the back of the flower. I used a contrasting color for demonstration purposes.


Pierce a hole through the flower using a large needle.

I like to put a lot of flowers on the needle at once. This way I can shape them all at once instead of one at a time. The stamens are on the right. Cut them in half.


Insert the stamen into the flower. I like to bend the stem at a 90 degree angle right at the flower so that the flower doesn't fall off. I found the stamens at Hobby Lobby, I think on the cake decorating aisle, can't remember, but not in the floral section. I believe they were made by Wilton.

Don't they look vintage. I am so excited that this project worked. I was really sad that I couldn't find those sweet vintage flowers :( at a reasonable price, but necessity  is the mother of invention.


See her sweet little party hat? That is a copy of some vintage wrapping that I found at an antique store. I will scan some more for a future post. 


Vintage wrapping paper scan for your personal library. I think the girls are the sweetest. Wouldn't you have just loved to receive a present wrapped in this paper at a Birthday party when you were a child? Why don't they make paper like this anymore?

I hope that you join the Easter Parade! Have a wonderful night and a crafty day,
Holly