
This morning DH, D#2 and I went antiquing and Christmas browsing. Well....actually I went antiquing and D#2 came along because I promised to take her to the wonderful Peppermint Forest and DH came along to get lunch (and to drive b/c I hate driving in town!!). The antique store is called The Sleepy Poet. I am not sure how many vendors they have but it must be over 100. I found one sweet booth that was almost like a yard sale. Her prices were very good. Here is what I bought. Notice all of the "unreplaceables" aka glassware/ceramics.

DHubby was in charge of the buggy and let's just say the store's floors were cobblestoned. Whenever D#2 and I lost hubby all we had to do was be quiet and listen for clanky, clanky, chink and we knew right where he was. I must remember to bring some jingle bells and tie them to the buggy so we will never lose him in any store, ever! In his most awesome practical mind he thinks if I am not near a buggy the less I buy b/c who in their right mind wants to shop with their arms full of unreplaceables, books, cookie cutters, large fisher price castle, keeping up w/ D#2 and chase after a buggy!?!? And on an empty stomach!?!? *snort* doesn't work.
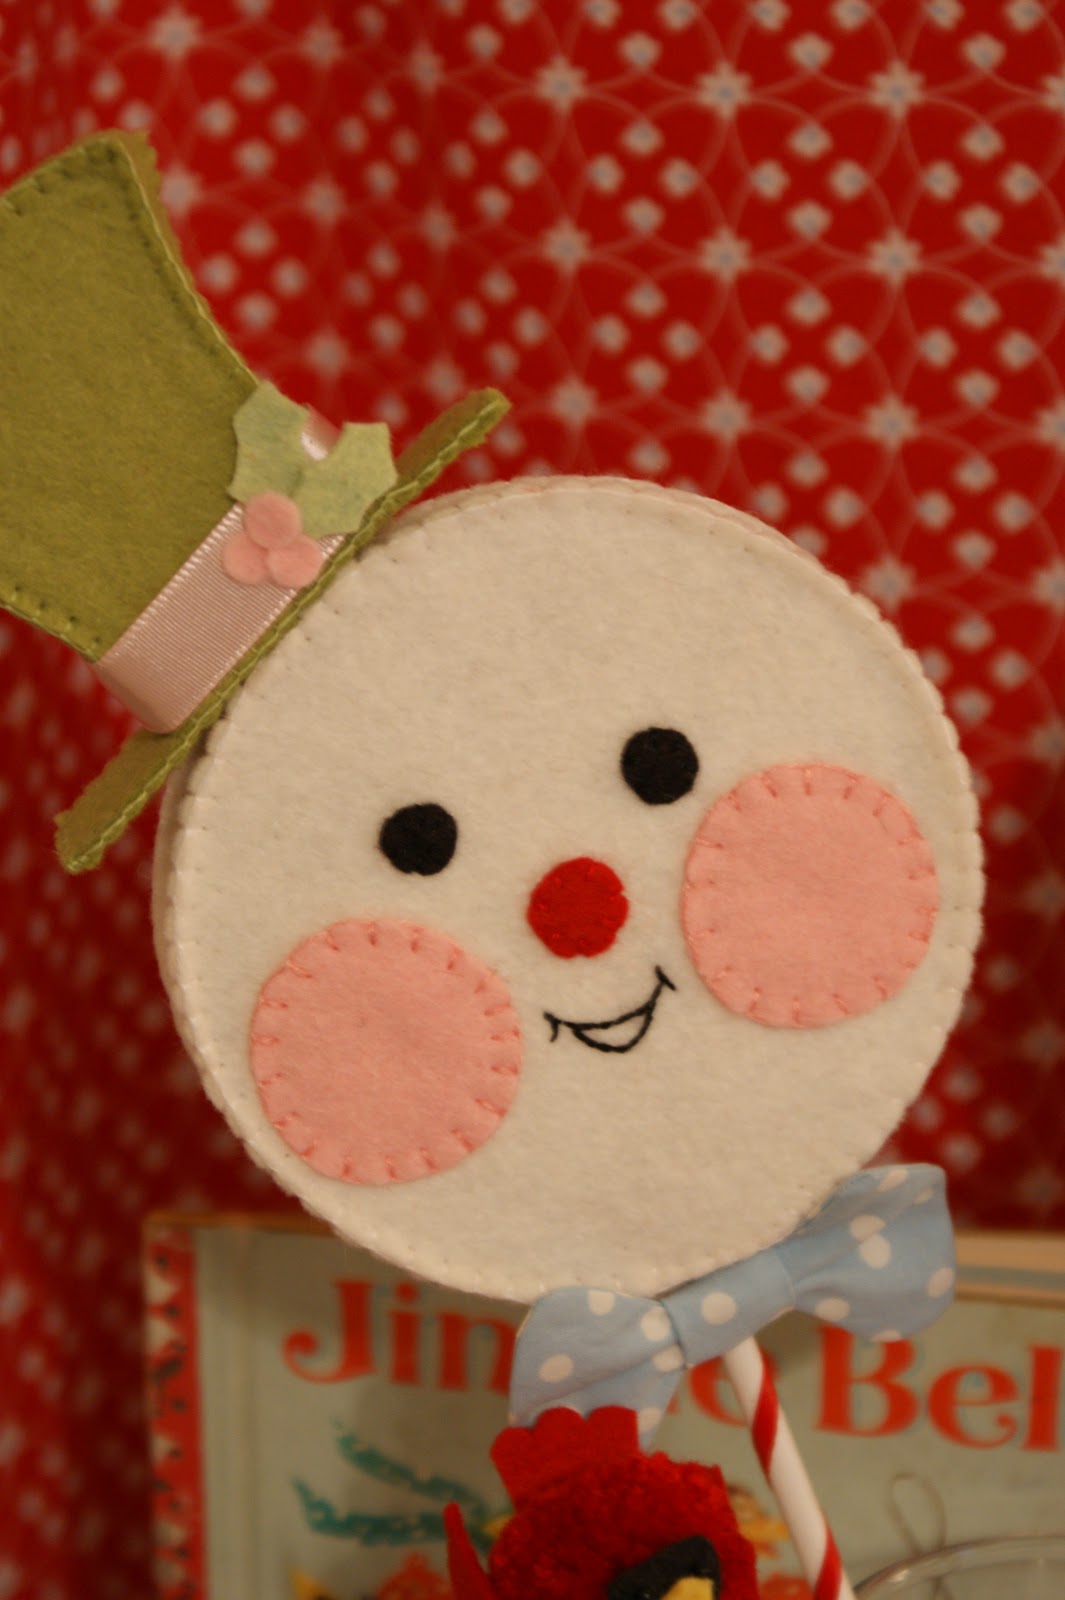
I have created these cute little Christmas Snowmen Shakers. They were so fun to make and when shaken they "jingle".


The Snowman on the left has a different mouth than the pattern.
Supplies:
~felt in assorted colors
~jingle bells (tiny, about the size of an English pea, you will need about 8)
~12" wooden dowel painted * I spiraled a ribbon down one and painted the other then put glitter on it)
~ribbon for the hat band
~poster board or light weight cardboard (from cereal/snack boxes)
~scrap of fabric for bow tie
~stuffing


1. cut out all pattern pieces
2. cut out all felt pieces *note to cut out 2 face, hat and hat brim pieces
3. Using the pattern for face, hat and hat brim cut out 2 of each out of cardboard about 1/4" smaller, hat brim requires only one cardboard cutout.
4. Stitch cheeks, nose and eyes to face. A tiny drop of glue will help keep pieces from shifting while you sew. Using buttonhole stitch on nose and cheeks and tack stitch for eyes. Draw mouth on with a disappearing pen. Stem stitch mouth.
4. Sew white strip (3/4" x 12 1/2") to face.
5. To reinforce face and back of head cut out 2 cardboard pieces about 1/4" smaller than pattern. Do the same for hat but only one piece for hat brim.
6. After sewing white side strip to face apply small amount of glue to cardboard piece using brush spread thinly. *Please take care that the plain side not colored side (with all of the wording) is glued to the back of the face. You do not want "Cheez-its" showing through on Snowman's face. Glue cardboard onto back piece.

7. Fill match box with jingle bells. Follow instructions for adhering box and inserting dowel step here.
8. Stitch back on, stuffing as you go.
Hat
1. Glue cardboard pieces to back of front and back piece. Let dry.
2. Glue sandwich for brim: bottom brim, cardboard piece (cut 1/4" smaller than pattern), top brim. Let dry.
3. Stitch hat front and side strip (3/4" x 8") together. Then stitch on hat back.
4. Lightly stuff.
5. Stitch hat top to brim, using buttonhole stitch. You will match up the long sides of the hat top to the long sides of the hat brim, making sure to center. This stitching will keep the hat top tightly on the brim, so it is not necessary to worry about stitching the short side of the hat top. *If this is confusing please let me know in the comment section and I can upload a picture :)
6. Glue ribbon to hat. Glue on holly leaves and berries.
7. Add scarf or bow tie.
8. Now you can add glitter to dowel. I also like to apply mod podge to my ribbon spiraled dowel. This keeps the ribbon from unraveling.
--------

------
Print size should be set at 8 1/2" x 11". It should fit a whole sheet of copy paper.

Above: I use a tiny hole punch to punch out holly berries. Since I use a wool blend felt the cut is pretty sharp but sometimes sharp tiny scissors are needed to help out. The long doll need is a wonderful tool for picking up the tiny berries to adding glue to places. I love this useful needle!
Hope you enjoy this tutorial and if it is as clear as mud, just email me and I will try to explain better. Have a wonderful, crafting weekend,
Holly
Super cute face and a fun idea with the shaker inside!
ReplyDeleteThank you Tammy! Hope you have a wonderful weekend!
DeleteVery cute shakers and I love the story about that stealth husband of yours!!
ReplyDeleteHey Eliz! So glad you stopped by. I know those girls keep you on your toes! Yes....he has stealth down to a "T". Shopping with the two of them is always an adventure :) Have a wonderful night! Love, Holly
DeleteHi,
ReplyDeleteI found your blog through Elizabeth's Creative Breathing. Thanks for all the tutorials. Sadly, I am still making your pumpkin shakers even though Halloween is past and I definitely want to make the snowman ones. Probably best to make at the same time since the the instructions seem similar. I noticed that you added cardboard to the snowman pattern to make it firmer. If you were to make the pumpkin shakers again would you do the same? I don't have a blog but I do have an etsy shop called Holibrations. I just love all things holidays and your crafts are so cute!
Thanks,
Carolyn
Super cute!
ReplyDeleteThanks!!