Yesterday I made some fabric leaves for a small swag. I had purchased a swag but just wasn't happy with it. It actually looks better in the photo than in real life. The pumpkin looked really fake and the acorns were purplish blue (not shown). I have some wonderful Jo Morton fabrics that I had been saving and knew that this was the project for them.
Fakey pumpkin and yucky leaves.
Above: Pattern for leaves. You could really make these out of any color fabric or felt. How about some red or aqua or even bright yellow leaves or even some with a 30s flair. Cute!
Supplies:
Fabric of your choice
6" painted brown floral wire* see note
double stick fusible web
(double stick kind-just means you can iron two fabric pieces together-I get mine at Hobby Lobby. Amazon sells it too if you can't find it locally. Any fabric shop will carry it.)
Sharp scissors
1. After you cut out leaf patterns, lay the pattern on fabric and cut out two rough square for each leaf (ex. the leaf in bottom left corner requires two 4x5" squares and same size fusible web).
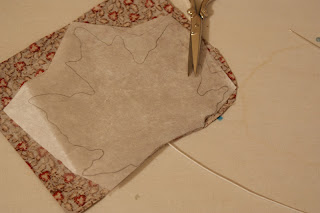
2. Layer the four pieces together, fabric, fusible web, fabric and pattern on top. Now carefully trim the bottom of the leaf to all layers. This will help with placement of the wire.
3. Make a sandwich: fabric, fusible web, wire-4" sticking out & 2" inside, fabric
4. Now iron the sandwich together for about 10 seconds. If you forget the wire after you have fused the pieces together don't worry, warm the fabric for about 5 seconds and the glue will remelt and you can lift the bottom of the leaf and insert the wire-just iron closed and let cool.
5. Lay the pattern piece on top taking care to line up the bottom of the pattern to bottom of the trimmed fabric.
6. Carefully cut your leaf out. You can crinkle the leaf to get a more realistic look.
*If you don't have white wrapped floral wire, you can make some. Wrap a pipe cleaner or plain wire with masking tape and paint desired color. I painted my brown. The pipe cleaners will be a little thicker than plain wire, but that is ok.
**If you don't have fusible web or can't find any, I think mod podge would work wonderfully. It might be a little messier but put some wax paper down and clean up will be a breeze!
Trim bottom of leaf pattern (before fusing pieces together) to make placement of wire easier.
Trimmed fabric(bottom layer) and wire in place. Now add trimmed fusible web and trimmed top fabric piece. Notice that my wire is white, I forgot to paint it before I started. Sorry for that ugly water stain from the iron. Didn't notice it while I was doing this project. Time for a wash!
The whole sandwich ironed.
Above: I pinned my pattern in place to make cutting out the leaf easier. Sharp pointy scissors are a must!
Above: All my leaves.
My velvet pumpkin with real pumpkin stem. Acorns are needle felted with real acorn caps. Tiny gourd on the right was part of the original arrangement. Learn how to make pumpkin here.
Above: My dressed up antique wooden hay fork. The tiny quilt is my take on a quilt from Primitive Quilts magazine called Country Days. I finished and quilted this in three days! Whew! That was a marathon, but if I didn't get it done I wouldn't be able to enjoy it this Fall, because it would have ended up in my UFO (un-finished objects) box. I pieced the whole quilt on my antique Featherweight. This is the first project that I have made on the little fw. I found that I was very accurate on this quilt and all but two or three points lined up beautifully. Using the rotary cutter for this small project just doesn't work. I used the old fashion way. I made two paper templates (the quilt only uses two squares!) and traced them on the fabric with a permanent, yes permanent pen and then cut all those squares out with scissors. The thin line on the permanent pen is much more accurate than the disappearing pen tip. This is why I was able to finish in three days. Usually I spend hours ripping out lopped off points trying to make them reappear. Maybe I shouldn't fixate on such small details but I can't help it.
Hope you have a wonderful day and get crafty and finish some UFOs!!
Holly


No comments:
Post a Comment
Thank you so much for your sweet comments. I treasure each and every one in my heart. I love reading them. Time often prevents me from responding to each comment but rest assured they are very precious to me.