Saturday, June 29, 2013

Let Freedom Ring!


I worked really hard yesterday to try and finish the Uncle Sam shaker. Whew....it's finished :) Just in time. You could easily make him in one day. Cut him out now and glue the cardboard pieces on and then tonight while you watch t.v. you can hand stitch him together.  


A very patriotic looking table.


I have been meaning to make some stands for the shakers for a while now. This way you could display them without worrying about the vase. They do tend to flip around in the vase and expose their back. Floral foam works great in the vase too. Just cover the foam with some type of filler: Easter eggs, Christmas lights, plastic grass, etc.
I painted a wooden plaque from Hobby Lobby (.50) blue. Sanded it to get it a little distressed looking. Rubbed a thin layer of Distress Ink (aka scrapbook ink-I love this stuff. It is what I use to make my paper look old and vintagey. I bought it from H.L. on sale. It is the Tim Holtz Distress Ink-vintage photo. ) I downloaded some sheet music, Star Spangled Banner of course. Printed it, cut a circle out, distress it and then mod podged it on. I also painted a layer of mod podge on the whole stand including the shaker rod. Drill a hole in the middle after the mod podge dries and stick the shaker in the hole.


Here is the back. Notice that I glued white cardstock onto the back of Uncle Sam's "shirt". I did the same to the back of the banner. Use the Elizabeth method to construct the head.
-----------------------------------------------------------------------------------------------------------


-----------------------------------------------------------------------------------------------------------------------


---------------------------------------------------------------------------------------------------------------


---------------------------------------------------------------------------------------------------------------------

I will also show how to make this banner on my other blog: Prims 'n Pins. If you have any questions, please don't hesitate to ask.
Have a wonderful 4th,
Holly

Wednesday, June 26, 2013

With Liberty and Justice For All.....

I can't believe that July is almost here! Boy, am I behind on my decorations. I had planned to make  a lot of 4th of July things, but time just slipped away. I still plan on making them but will be posting them after the 4th :)
Anyway, here's a fun little shaker. Meet Liberty, the American Bald Eagle. He is so simple to make. If you have made one of my shakers before, he is just like them except the face piece is glued onto the shaker body.

The USA banner is just card stock, old dictionary pages (thanks Tammy!), silver pipe cleaners(twisted into tiny circles), blue stars, vintage tiny blue ric-rac and jute. I used bamboo skewers painted white and little wooden ball on top for the banner holders. I thought these "holders" looked like drum sticks. Would he be cute holding a vintage looking drum?


My dining room table. Even President Lincoln and President Washington decided to make an appearance. You can find their instructions here and here.


I placed a piece of floral foam in the bottom of this pewter pitcher. Stuck the flags in and then Liberty. I shredded some newspaper in our paper shredder and used that as a filler so that you couldn't see the floral foam. Shredded parchment paper would look awesome! If you decide not to place him in some sort of container to display him, sweet Carolyn sent me a tip that she came up with. Place a cute little end cap on the end of the wooden stick to cover the plain exposed end.

Thanks for this awesome tip, Carolyn!!


The back of Liberty. I glued the wings on using hot glue. Hot glue sets much quicker than my standard white craft glue. You can also see that the face piece is bigger than the shaker body. I matched the top of the face panel to the top of the shaker body and glued the face on. You can glue the banner poles onto his "hands" or do as I did and stitch the poles to his "hands". Which ever method that you choose, just remember to fold his "hands" around the poles to make it look like he is holding onto the poles.


I originally made this banner for Liberty, but as you can see it turned out too long. It does add a festive touch to the little birdhouse. I plan on making a tutorial for this banner on my other, poorly neglected blog Prims n' Pins. Hopefully before this weekend.

President Lincoln. Feather pen in his hand and the Gettysburg Address in the other.

President Washington with his tricorn hat. See the piece of cotton in lower left hand corner? I grew that in my garden last year! The flowers on the cotton plants are so pretty- some are pink and some are white.
---------------------------------------------------------------------------------------------------------------

----------------------------------------------------------------------------------------------------------------------
I used 10mm safety eyes (Hobby Lobby, over on the teddy bear/doll making section). I broke the stems off of the backs of the eyes and just hot glued the eyes on. The eyebrows are stitched on using 2 strands of embroidery floss.
Even though it looks like I stitched the face panel on, I didn't. I just used the button hole stitch to go around the panel and then glued it onto the shaker body. You really don't have to do all of that stitching, I just like the look of the buttonhole stitch :)

Here's a layout of the feathers and face panel. The feathers will be layered. I glued the layers using the white craft glue. Glue row 1 to face panel, row 2 to row 1, row 3 to row 2.
For the beak: Sew two upper pieces together, just along the rounded edge, leaving the back and bottom open. Do the same for the lower beak but leave top and back open (zoom the picture for a closer look). Glue the upper beak on and then glue the lower beak on. 
------------------------------------------------------------------------------------------------------------------


--------------------------------------------------------------------------------------------------------------------
Basic shaker body. Follow instructions here or here (in this tutorial with the pumpkin shakers, I forgot to add the cereal box cardboard, don't forget to add that to the shaker body and to the hat panels). Hat tutorial found here, add strips of red felt for the stripes and a piece of blue felt for the hat band. I glued some little silver stars on the band. Fun!!

If you have any questions, please don't hesitate to leave a comment with your question!

Have a wonderful night and day and don't forget to add Liberty to your shaker collection!! If you make Liberty, I would love to see him. It warms my heart to know that someone would take the time to create something that I designed and I get such joy seeing your handiwork!!
Happy sewing,
Holly


Saturday, June 22, 2013

Pillow Fun!

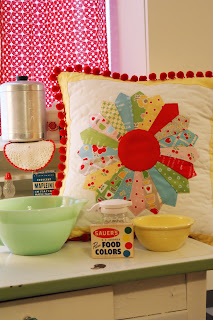
Hello again! Seems so long since I posted. Even though my blog has been quiet, I have been busy, busy, busy. Son graduated and we had his party, grandparents came and then left (we had a blast with all of them!!) D#1 had her wisdom teeth removed and I have been making pillows for the future kitchen window seat. Right now we are using our antique church pew as the window seat. The first pillow that I made was a Dresdan plate pillow with pompom fringe. 
Arranging the spokes to see what works. This is Lori Holt's Bake Sale line. The pillows will match my placemats-placemat tutorial on previous post.

I didn't handstitch the plate on, I used the sewing machine b/c I know that these pillows will get a lot of abuse.

This is a pattern by Lori Holt. It is the Sew Hexie Pillow pattern. The hexies are all handstitched and handstitched on. This pillow is really hands on and takes a little longer than the Dresdan plate pillow, but it is sooooo worth it!!


Look how wonderfully it blends in with vintage kitchen stuff!

This one too!

I used Bake Sale fabric! I know it's had to tell on these little hexies but the center hexagon is cut out  of the fabric with the recipes on it. Sew cute!!

Hope you are having a wonderful weekend,
Holly

Monday, June 3, 2013

Placemats With Bake Sale Fabric!

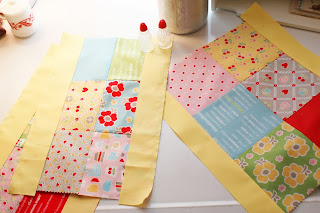
Have you seen Lori Holt's new fabric line called Bake Sale? If not, you are in for a treat. I love the 5" charm packs! Did you know that one charm pack plus a little bit of extra fabric will make 4 placemats? Since my local quilt shop doesn't carry this line or kona solids, I had to order my charm packs from Etsy and purchase my yellow and green solids from Hobby Lobby. I really love to support my LQS, but I also love the online Etsy stores :)
Charm pack from Etsy and kona solid from Hobby Lobby. 

Supplies needed to make the placemats and napkins:
1 charm pack (you will need 24- 5" charm squares)
cotton batting
jumbo ric rac (Hobby Lobby)
2 yds of a solid to match your charms (for sashing, binding and back)
good quality white thread (such as Aurifil)


Arrange you charms. Two rows, 3 on top and 3 on bottom. I like to chain piece whenever I sew. This means that after you sew something don't cut the thread, but continue sewing. To start, sew 1 and 2 and then 4 and 5. Now, cut 1 and 2 away from 4 and 5 (leaving 4 and 5 under the needle) , sew 3 to 2. Cut 4 and 5 away from 1 2 3 and sew 6 to 5. 

Chain piecing.

Iron the seams in opposite direction. Such as, top row iron to the right and the bottom row to the left. This will cause the seams to "lock" when you sew the rows together. Sew the rows together.

Rows all sewn together. 4 place mats in the works.


 Cut 8 strips from the solid color for the top and bottom: 2" x 15".
Cut 8 strips from the solid color for the right and left sides: 2" x 13 1/2". 
Sew the strips to the top and bottom of each placemat.

Trim the strips and then sew the sides on. Trim the sides.

Now it is time to make the quilt sandwich. Cut the backing about 2" larger than the top and the batting about 1" larger than the top. Layer: backing, batting and then top. Pin the layers together. Now you are ready to quilt the layers either by hand or with your sewing machine. If you have never used your machine to quilt before, this is a great project to start with. You can either stitch in the ditch (stitch straight lines along the seams-this is great for beginners) or stipple. Stippling involves a special foot used for quilting and you will need to lower your feed dogs. Straight stitching doesn't require anything special. The seams are your guide. A walking foot makes things go much faster but if you don't have one, make sure that you sew the layers together very, very slowly. Going slow will keep the layers from bunching up and making a mess on the back of your placemats. 

I like to use gloves when I stipple because I can get a better hold on the fabric and I feel like I have better control over the fabric layers. Remember to remove the pins as you go. There are wonderful tutorials on machine quilting on Youtube. 

When you finish quilting, trim off the excess batting and back fabric. Add some jumbo ric rac and then add the binding. I use a 2 1/2" binding, iron in half, stitch it on the front, fold it over and tack it down on the back. There are a lot of wonderful tutorials out there on how to put binding on quilts, I used the same method on my placemats. Pinterest is a good place to look. 


Finished! With the left over solid kona, I made some napkins. I also crocheted a cherry napkin ring, it just ties onto the napkin. 


Option 2: a built-in napkin holder. You will need to sew a strip of material onto the placemat to make the holder. Take four 2" x 6 " strips, sew them down the middle, iron seam open,  turn them right side out, tuck the ends inside, iron again, stitch down each long side , stitch left side onto placemat, put napkin down to measure. Now stitch other side onto the placemat.


Orange ric rac.

White ric rac.


Cherry napkin ring.
 If you would like a tutorial for this napkin ring, just leave me a comment and let me know. 


I used my serger to make a rolled hem on the napkin. I love this method and will be making many more napkins. They were so easy to whip out. If you would like to make some, just look in your serger's instruction booklet for the rolled hem stitch. Wouldn't vintage sheets make the cutest napkins?
Hope that you enjoyed this placemat tutorial! And go get you an $8 charm pack and make some adorable placemats. I plan on making some pot holders and a dish drainer mat to match. I will also be showing pictures of my flowers and garden (for you mom!) and how to stamp words onto vintage silver plated silverware in the coming weeks. If you have any questions about the placemats, please don't hesitate to ask!

Have a wonderful crafty week!!
Holly