Friday, December 21, 2012

Yes, Virginia......

 
I love everything about this wonderful time of the year! The hectic pace, yummy smells, glitter everywhere, music, cheerful atmosphere, shopping, winning gingerbread house contests, making gifts, decorations, classroom parties, kids home from school, school plays, choral presentations, Christmas movie specials (yay Hallmark channel) and of course celebrating the birth of Jesus Christ! What a glorious time!!
 
To add to my menagerie of felties, I have decided to include a character from one of my all time favorite Christmas specials: Yes, Virginia, there is a Santa Claus. I thought that the newer version of(CBS/Macy's) Virginia would be easier to replicate. Not to mention I love that clay character and stop motion look that the movie has- kind of like the old Rudolph and Santa specials that I absolutely adore.
The animated Yes, Virginia, there is a Santa Claus.
 
Here she is with letter and pencil in hand!
 
 
I am going to simplify my instructions today because I am crunched for time. If you need any help look on some of my previous posts, especially Father Time. This will explain how to sew the coat on without getting frustrated :)
 
1. Paint box light baby blue. Paint white snow swirls and accent with glitter. I also added an envelope (on pattern) and one pencil to each side of the box. I added a painted red square for a stamp.
Make the lid just like the other characters.
2. Boots/legs cut from black felt and assemble. Lightly stuff.
3. Sew body and arms. Lightly stuff.
4. Stitch arms and boots/legs to body.
5. Sew head, before attaching back of head to front don't forget to stitch on face and cheeks. ** I had the hardest time with her eyes. I solved the wonky eye problem by drawing them on paper with a fine sharpie and cutting them out, then gluing them on her face.
6. Stitch back of head to front of head. Stitch hair on. Do not sew head to body yet.
7. Now, sew coat on (remember to read Father Time's robe instructions for help).
8. Add cuffs, gluing them on.
9. Add toggle strips, only gluing the tips. You will thread the scarf through the toggle, once the glue had dried.
10. Buttons and barrette are made out of paper clay. Dry. Paint the buttons and barrette.
11. Glue buttons onto ends of toggles.
12 Glue barrette onto hair.
13. Attach head to body.
14. Add scarf. If scarf is too big to fit through toggles, just trim scarf down until it fits.
15. Pencil is just end of toothpick painted to look like a pencil.
16. Letter, written in your best 8 year old cursive.
Dear Editor,
I am 8 years old.
Some of my friends
say there is no Santa
Claus. Papa says "If
you see it in the Sun
it's so." Please tell
me the truth, is there
a Santa Claus?
 
Virginia O'Hanlon


Toothpick pencil.

Letter, almost ready to mail.

Snow swirls, glitter, white dots, pencil and envelope addressed to the Editor. I did some research and some of the information said that she mailed it to The New York Times and some to The New York Sun, you could use either. I believe the Sun turned into the Times later on. I used the Times on my envelope by mistake. I originally had planned to use the Sun but forgot. Don't forget to mod podge it on the box.

back


The gang's all here!
This will probably be my last post of 2012. Can't believe the year is almost up!
I'll be back in January with some cutie Valentine things.
 Have a Merry Christmas!!
Holly
 
6 For unto us a Child is born,
Unto us a Son is given;
And the government will be upon His shoulder.
And His name will be called
Wonderful, Counselor, Mighty God,
Everlasting Father, Prince of Peace.
7 Of the increase of His government and peace
There will be no end,
Upon the throne of David and over His kingdom,
To order it and establish it with judgment and justice
From that time forward, even forever.
The zeal of the Lord of hosts will perform this.
Isaiah 9:6-7
 

Saturday, December 8, 2012

Gnome Sweet Gnome

Well....the countdown has begun. D#2 told me today that we have 17 more days until Christmas. Wow, guess I had better get busy. So much to do and I am loving every minute of it! Today I have a clothespin doll for you. I love these little dolls. I have had a picture of a similar vintage doll on my computer for a few years now before I discovered Pinterest and I am not sure where I saved the picture from. Originally she looked like she was made out of pipe cleaners and a wooden bead for a head. She is such an adorable little gnome. I turned her into a Christmas gnome but you could easily make her into a Spring, Summer or Fall gnome.
 
Feeding time for the little fawns.

Sweet little fawn tutorial at Creative Breathing (click here). The fawn on the left reminds me of my sweet little dog at feeding time- eager beaver :)

Displayed on a mushroom pedestal!
 
 This was my first time using yarn as hair on my peg dolls. I usually paint the hair. If you happen to zoom in, don't be surprised at the messy hair cut. I cut hair kind of like I make floral arrangements. True story: I use to cut every one's hair in my family -Dear Hubby, Daughter#1, Son, my bangs (back when I had bangs) and even Dog, this was maaannnnyyy years ago. This little side job that I maintained saved us lots of money. I was quite proud of myself. I had years and years of experience- I did after all have the childhood job of pet groomer which all of the pets were proud to sport their new "do" (I don't count the little dog that hid everytime I gave him an adorable cut-he was just shy).  One day while I was cutting DH's hair, I made a mistake......of course I didn't say anything, it was a little tiny mistake about the size of a quarter. It was on the back of his head, who would notice? Everyone at work and I mean everyone asked him who had cut his hair?!?! Really?.....it wasn't that bad. I promise. Well....I lost my job that day and after that everyone went to the barber, Salon and groomer. It's funny, I can make just about anything (or at least pretend that I can) and there really isn't a craft that I won't try, but for the life of me I can't wrap a present, cut hair, make a floral arrangement, draw a decent circle, grow hollyhocks, or even draw a straight line. These little quirks drive me crazy! So I apologize for the messy hair on the otherwise cute gnome :)

Little Rudolph deer waiting patiently to be fed.
 

Sack of reindeer food.
 
 
Supplies for clothespin doll
wooden ball knob-face already painted and mod podged
old style clothespin-legs painted black and body painted flesh and mod podged
peg stand-painted black and mod podged
yarn for hair
two small silver beads
ric rac
wool blend felt
paperclay-made into balls for hands, dried over night and painted and mod podged
one green pipecleaner
 
Supplies for mushroom
wooden plaque-painted red with white polka dots and mod podged
wooden candle stick painted white and mod podged
artificial picks
 
Supplies for Reindeer food sack
I used osnaburg to give it a burlap sack look but you could use any scrap of fabric that you have. A piece of muslin would work well.
stamp letters
stamp ink
 
This project uses glue for everything. No sewing required (I did cheat and sew the shirt sides together- I am very messy with glue so I opted to pick up needle and thread for this part of the project, but you could definitely glue it using straight pins to hold it together until glue dries).
 
1. Cut out felt pieces. Drill a small hole for the arms in the peg- 3rd picture below shows arm placement.
 
 2. Glue pants legs in place and stuff excess between legs. I used a sharp pair of scissors to stuff. You may need to trim a little off the sides of the "pants" in order to stuff them between the peg legs.
 

 Your pants will end up like this.
 

3. To make the arms glue one sleeve on. Insert the other side of the pipe cleaner through the hole in the peg. Now glue the other sleeve on. Cut pipe cleaner flush with sleeve.
4. Glue back shirt piece on (see photo above).
5. Glue front shirt piece on, glue (or stitch) sides together. Glue ric rac and buttons on. Let dry. Glue holly leaves and berries on.
6. Make gnome hat. Let dry.
7. Glue hair onto head. Let dry.
8. Glue head onto body. Let dry. Glue hat on and then hands. Let dry.
 
Reindeer food sack
1. Cut out two sack pieces.
2. Sew the sides & bottom together with sewing machine. You could probably glue them together.
3. Stamp "reindeer food" on sack.
4. Stuff lightly and I placed a small oval of light brown on top of the stuffing to have a finished look.
5. Tie two corners with embroidery floss.
 
Finishing
Glue mushroom top to mushroom bottom. Let dry. Now just glue everything on. If you made Elizabeth's little fawns add them. You could really add any little animal that you have on hand. I know some of you find the most wonderful vintage plastic animals that would be just perfect on this. I did add some plastic picks from Walmart that I took apart and hot glued to the back. This was the only time that I used hot glue. I like using white glue for everything else.
*Don't forget to sign and date the bottom of the mushroom. This will come in handy 5 years later.
You are now finished. Wouldn't a little gnome dressed in white with a red fawn be the cutest. Hmmm...I am making more crafty work for myself :)
 
Have a wonderful crafty weekend and let me know if you make a Holly Gnome, I would just love to see her,
Holly


Thursday, December 6, 2012

Look At Frosty Go!

I love snowmen! I think that they are just adorable! We don't get much snow here in the Piedmont area of North Carolina, so I have to rely on snowy crafts to get my fill. I found the cutest snowman on Pinterest. When I clicked on it to follow the link it brought me to the cutest website. She had snapped the photo at a craft show which meant.....boo hoo, they weren't for sale. I knew that they were needle felted and I just happen to know how to needle felt. So I made one and it turned out to be the cutest little snowman. Really very simple. I wanted to do a tutorial on him, but I know that not everyone needle felts (hey to my sweet sis!). That got me thinking, what do I have that we can use that is pretty much common in every household. Styrofoam balls, fabric balls, ping pong balls, acorns, etc? What about cotton balls?
The little guy on the left is made out of two cotton balls and the one on the right is needle felted.
 
 
Inspiration photo, via pinterest: heathercameronstylest.
Pattern for hat and nose.


Supplies needed and of course paint brush and needle. Brown circle is a thin wooden disk. If you don't have one just cut out two smallish circles from a cereal box, glue together, let dry and then follow the steps below.

You will unroll one cotton ball.

Now reroll it. Try to keep this ball smaller than the body ball. You can use your fingers to brush/smooth the cotton ball. Gently rolling it in your hand helps, but don't do this too much or your ball will start looking lumpy. A tiny drop of glue may be used to keep the newly rolled ball from unraveling.

In this photo I have made one eyebrow and am in the process of adding a seed bead eye. Finish the other eyebrow and other eye and then make the mouth (look at photo for placement). Cotton material can be a little tough for the needle to push through, so make sure that you have a very sharp new needle. If this step intimidates you or you struggle with it, just use glue instead. Snip a tiny length of thread (1/8" or smaller) for the eyebrows and mouth. A needle can be a useful tool in helping you to manipulate the thread into place. Glue eyes on, using needle to place drops of glue on the cotton ball before adding the eyes. If the orange felt nose looks too squarish and not round enough to look like a carrot, gently roll that between your fingertips and glue in place.

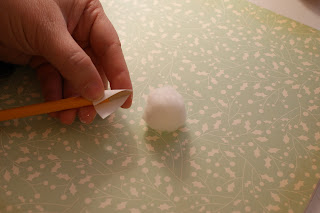
I found that curling the hat around the end of a pencil helps the hat hold it's shape so that you are able to easily glue the sides together. After the glue had dried, coat the hat with mod podge and dip it into the fine glitter-shh...I don't know if this is proper etiquette but I just dip it right into the bottle, sometimes double dipping.

Looks like a marshmallow with a face!
 
Paint the wooden disk then apply mod podge and glitter. Now assemble the snowman in these steps:
1. Glue body onto disk.
2. Glue head onto body.
3. Glue hat onto head.    
The cotton ball snowman is kind of fragile. He doesn't like being messed with a lot, because he is just a cotton ball after all. Very carefully tie his "scrap of ribbon" scarf on or you could aways glue a bow on-cute! After this step you can add some cheeks. Makeup blush applied with a cotton swab is all he needs or just leave him plain.
Even though the cotton balls are way more fragile than the needle felted balls, I still love this Little Cotton ball Snowman!
 
BFF!


What different personalities each one has even though they were made practically the same way :)
 
 
On the Frosty shelf. Tutorial for the Glittery Paper Icicles on yesterday's post.
Have a wonderful, keep those fingers busy kind of day!
Holly
*ps. be sure to go and check out ImagiMeri's blog to see the awesome vintage ornament wreath she is giving away! I love those wreaths.


Tuesday, December 4, 2012

Glittery Paper Icicles

I can't believe how fast the days are flying by! Yesterday I helped out at D#2's school with their Wiseman's Shoppe. It was so much fun helping the children pick out gifts for their family members. Each year the school asks for donations of gently used items. These items are priced anywhere from .25 to $5, with most at $1.00. I was a personal shopper for a while then a present wrapper. Let's just say my wrapping skills are not the best. I am not sure why, maybe I just get impatient. I also struggle with floral arrangements. My middle sister is a whiz at florals, but me, not so much.
 
Have you seen the cute icicle garland floating around Pinterest? Some of it looks like cotton batting and some looks like paper. I think the batting with glitter sprinkled in would look amazing, but alas, I only have scraps of batting, nothing big enough to work. So, paper it is. I have made a pattern for you to print and cut out. My icicles tend to have a rounded end, much like the real icicles that have started melting. If you like more pointy ones, just snip the end into a point.


This is my Frosty shelf. As you can see the shelf is green, which works great in the spring and summer but not so well in the winter. I figured the icicle edging would cover most of it up. The icicles look  more adorable in person, especially with the sparkly glitter.


*Tip, if you need a longer garland, just place several sheets of paper together and tape at the "X". This will help to keep the paper from slipping while you cut several out at once. If you use more than two sheets your best bet is to staple them together. :)

These are all of the supplies that you will need + a paint brush.
1. Cut out icicles.
2. Kind of glob the mod podge on (this stuff dries quick on paper so a thin coat will be dry before you are able to add the glitter- but don't glob too much or the paper will curl).
3. Now add glitter-*Tip: mod podge about a 3-4" section, then apply glitter, shake off, the mod podge another 3-4" section, and so on until it is completed. I only glittered the icicle and not above the icicle-I figured that this might make the paper curl too much.
4. Let it dry. If the icicles start to curl wait until they are dried and then you can straighten them.
5. I used double sided sticky tape to attach it to the shelf. I believe it is called red line tape. This stuff is strong.


A little corner of the craft room. 


Close up of the garland. I need to tape the joint where the two pieces of paper meet so the crack doesn't show.
 
My inspiration board.
 I tried to find an old gate that didn't cost a fortune. I gave up after about 2 years and one day while pulling into my garage I spied my old crib springs. Ah, ha! 3 coats of white later, I now had a great place to display my inspirations. Side note: My mom gave me my baby crib years and years ago. It has traveled with us to Alabama, Mississippi, Florida and now North Carolina. I am so glad that I have hung on to it. Many time DearH wanted to get rid of it because it was in the way-I agree, at times it did get in the way. The rest of it is hanging on the garage wall waiting for inspiration to hit.
 
 
Funny little robot snowman in my favorite colors.
 
I hope that you have a wonderful crafty day and be sure to make an inspiration board. They are wonderful! Even an old cork board could do the trick. Elizabeth, over at Creative Breathing, even used an old trellis she salvaged. It looks amazing.
Holly